Protocol: Lotion Recipes w Art
Background
Here we are focusing on a well-known emulsion — lotions to explore intermolecular forces. In completing this protocol, you will create a lotion where water droplets are dispersed in a continuous phase of different oils. Of course, the ratios of oils and water in this protocol are just suggestions! Feel free to manipulate these ratios to see what kind of consistency and texture you get. Remember, there is no right or wrong!
Materials
Common items
- Writing utensils for labeling
- A notebook, binder, or digital document for record keeping

Head to the Kitchen, Grocery Store, or Online Store
- Water — you can use tap water or purchase distilled water
- Oils — we are using a mix of sunflower and grapeseed, but lots of oils work!
- Emulsifying Wax
- Stearic Acid
- Glycerin
- Essential oils for aroma (optional)

Equipment
- Containers for mixing — large bowls or beakers have been helpful in our experience
- Utensils for scraping — regular spoons work, but we love using rubber spatulas
- Kitchen Scale — set to grams
- Stick Blender, countertop blender, whisk, or other method/tool to provide a mechanical mixing force
- Kettle, saucepan, or microwave to heat water
- Double Boiler/water bath, saucepan, or microwave to warm oils and melt wax
- Containers, with lids, for storing lotion
Uncategorized
- A flat, uncluttered, and cleaned surface for making your lotion
- Whatever you need to clean as you go
What is lotion made of?
Lotions are made up of different kinds of oils that are mixed with water and other aqueous (water-based) components. “Oils” is a very broad classification! As it turns out, you can use any number of oils as a base for your lotion emulsion, such as oils from almond, avocado, grapeseed, olive, sunflower, or other kinds of familiar produce. However, to keep these oils from separating from the aqueous ingredients, we must also include an emulsifier.
The addition of an emulsifier creates a bridge between oil and water. This is because emulsifying molecules are amphipathic compounds, meaning they have segments that “play nice” with water, and segments that “play nice” with oils. An example of a water-oil bridging agent is the ingredient “Emulsifying Wax NF” (vegetable-based), which has both polar (plays nice with water) and nonpolar (plays nice with oils) segments in the molecule.
Tips before diving in
In this protocol, the oil components are prepared separately from the water components. In addition to Emulsifying Wax NF, we will leverage thermodynamics to help bring the water and oil together into a lotion. More specifically, both the oils/wax and aqueous ingredients will be warmed, separately, to ~60℃. Warming helps to maximize the work of the emulsifying wax. Note that there is no need to go higher than ~50-60℃ for this to take place. Just be careful when handling the warmed ingredients.
After the initial preparation, the oil will slowly be drizzled into the water, over the course of several minutes, all while blending with a stick blender. If you don’t have a stick blender, you might consider using a countertop blender, a whisk, or even a jar with a tight-fitting lid that you can shake!
In addition to the note about mixing, here are a few extra pointers:
- Make sure your work surface, equipment, and containers are clean. You are making something that goes on your skin — you don’t want it to be gross.
- Organize your raw ingredients — things might move fast, so it is best to have everything ready
- Read through the protocol before starting so you know what to expect
Get familiar with the properties of your ingredients
What does it mean to “dissolve?”
The following table provides an explanation of how each ingredient included in this protocol contributes to making the emulsion (lotion). Each chemical component (yes, these ingredients are definitely chemicals!) is described by the following terms:
Polarity: Describes the separation of an electric charge within a single molecule. Molecules can be nonpolar or polar.
Nonpolar the electric charge is equal throughout the molecule
Polar the electric charge is far enough apart to cause one portion of the molecule to have a positive charge and another portion of the molecule to have a negative charge (opposite charges in a single molecule)
Solubility: Describes the properties of a molecule that allow it to dissolve in a solvent. Solubility is related to the polarity of the molecule.
Hydrophobic molecules are nonpolar and are not soluble in water (polar molecules).
Hydrophilic molecules are polar and can dissolve in water.
An Amphiphile describes a molecule that has both nonpolar/hydrophobic and polar/hydrophilic properties. Greek in origin, amphiphile translates to “friendship.” In emulsions, an amphiphile helps to mix molecules that are normally immiscible.
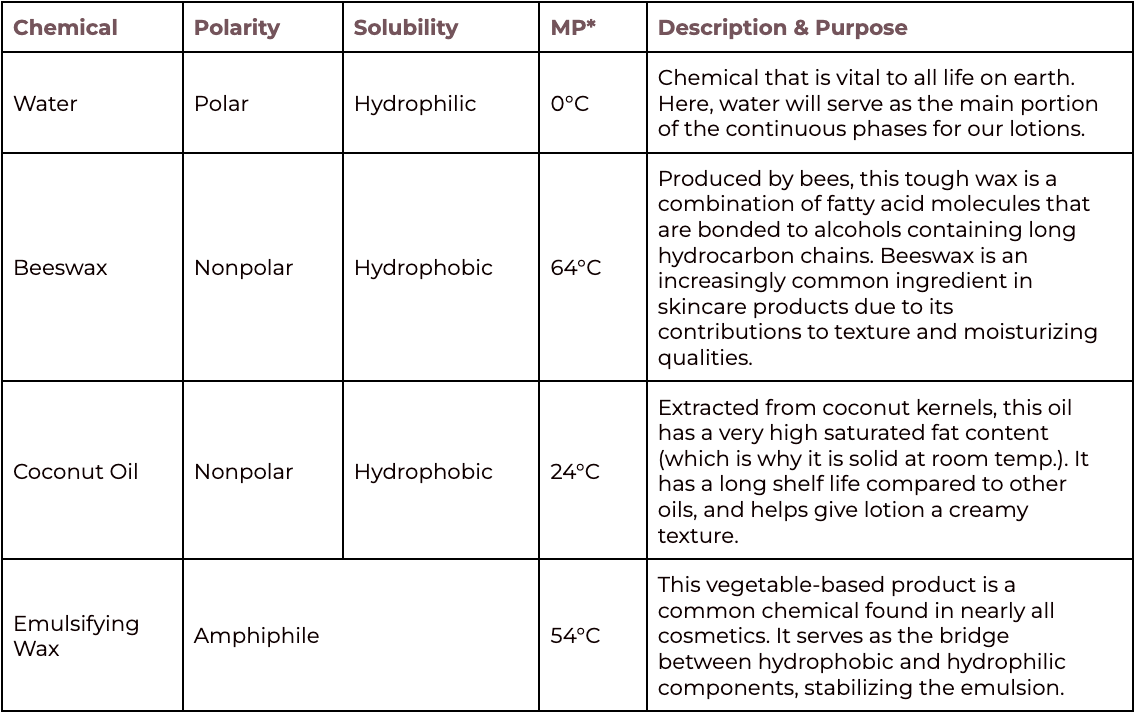
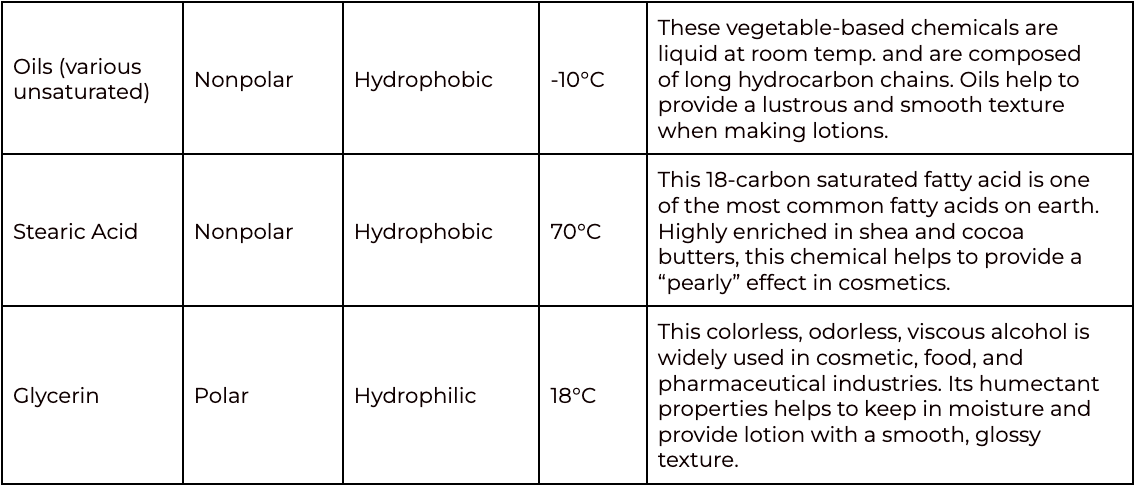
*Melting point under normal atmospheric pressure
Ready. Set. GO!
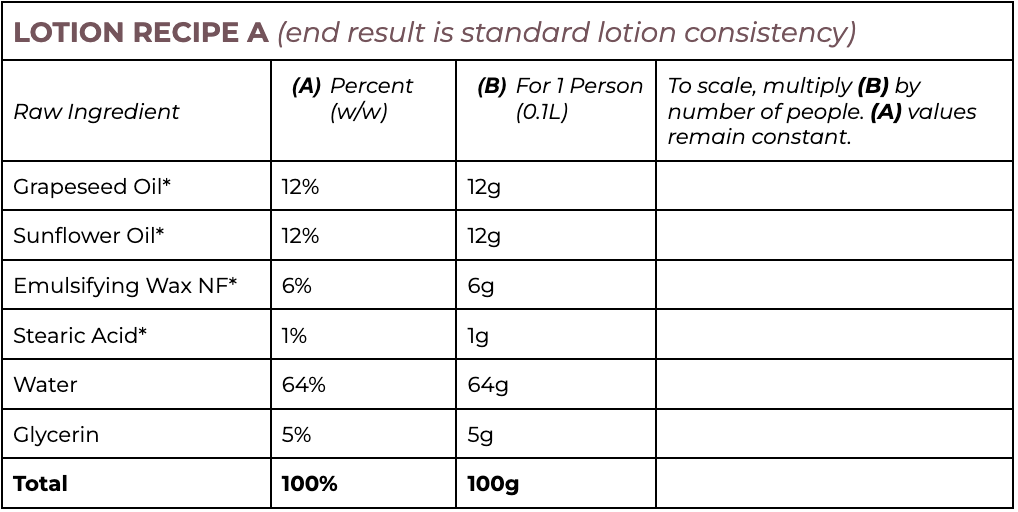
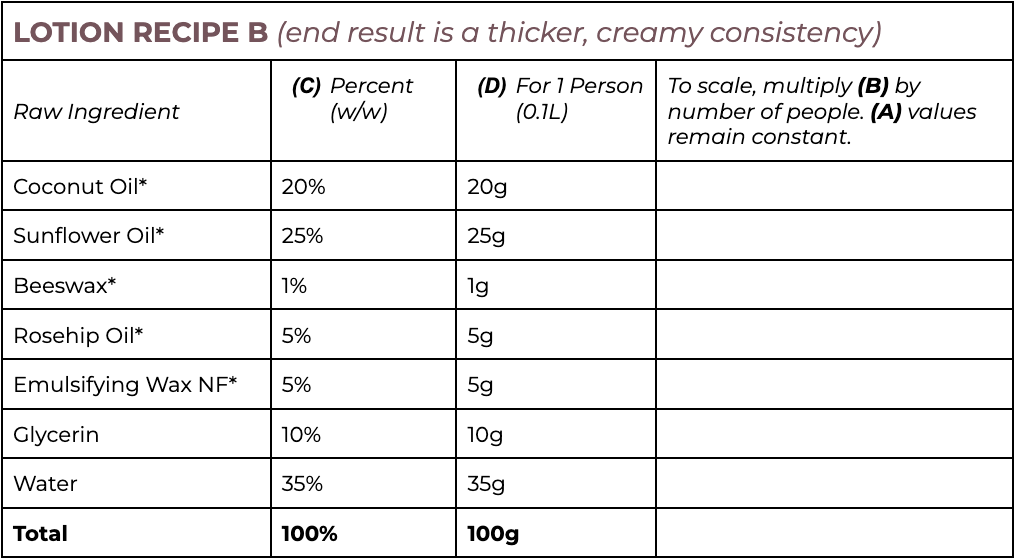
Lotion Recipes
Note that all ingredients are weighed in grams, even water.
Lotion Protocol
- Choose which recipe you will try Lotion A or Lotion B.
- Weigh out your hydrophobic* components and add them to a labeled container (this container does not need to be as big as the container holding the water-based ingredients).
- The hydrophobic components are those that are not soluble in water — Grapeseed Oil, Sunflower Oil, Stearic Acid, and are indicated with an asterisk*
- Weigh out the emulsifying agent and add to the container containing oils.
- Apply gentle heat: This will all need to be warmed such that the emulsifying wax (and beeswax, if using) liquifies.
- To warm you can use a water bath or double boiler (can take around 30 minutes), or microwave at a LOW setting for 1 minute at a time followed by swirling, until the mixture looks uniform
- In your largest container, combine the water and glycerin ingredients. Warm.
- Warm the aqueous ingredients (water and glycerin) using a saucepan on the stovetop, a microwave, a hotplate, or whatever you have handy!
- You only need this to be around the same temperature as the oils — Maintaining equivalent temperatures is essential when you get ready to mix the hydrophobic and hydrophilic components.
- Note that you will be adding the oil into this container, so make sure it is big enough!
- Prepare your station for creating the emulsion by gathering your emulsion blender and the container with water and glycerin.
- When you are ready, start blending the water/glycerin mixture with the emulsion blender to create a vortex.
- While keeping a vortex going, SLOWLY drizzle in the hydrophobic (oil) components. It should take at least 1-2 minutes to transfer all of the oils into the water.
- Note that if you are working with beeswax, you should be prepared to work quickly! It solidifies FAST. If your oil-beeswax mixture begins to solidify before you finish adding to the water, you should rewarm it — you can do this many times if necessary
- After about 3-5 minutes of blending, you can accelerate the formation of lotion by placing your mixing container into an ice bath (be careful not to get water from the ice bath into your lotion!) — this is an OPTIONAL step
- Mix well for about 15-30 minutes, turning off the stick blender every few minutes to scrape the sides of the container with a spatula
Do not lift the stick blender above the mixture or else you will make a huge mess, and add too much air to the moisturizer
11. Once the mixture is efficiently combined, scoop into jars that have been labeled and dated.
General Notes
Once your lotion and cream is finished, feel free to add essential oils at home to give it “flavor.”
Please note that we are NOT adding any type of preservative to prevent microbial growth. This means your lotion and or cream might grow some bugs! To help prevent this, you can keep your lotion and cream jar in the fridge.
Lastly, feel free to experiment with different ingredients. I have played around with different oils and waxes with some success (and some failure, but it’s always fun!). You can also add things like vitamin E oil (when the mixture has cooled down a bit, but isn’t quite yet thickened), green tea powder, or other types of scented things. There is no right or wrong, so go for it! Trial and error is what science is all about…

")


