Testing Substrate Specificity in Yeast Fermentation
Background
As Eduard Buchner discovered at the turn of the 20th century, the process of fermentation is a multistep, enzyme-catalyzed reaction. Enzymes work best under specific conditions and with certain substrates, and the enzymes driving glycolysis and fermentation reach their highest activity in environments that mimic natural physiological conditions. To demonstrate this point, we will add different sugars to “active dry” yeast that can be purchased from the supermarket (Fleischmann’s or Red Star are brand examples). This common product is a freeze dried collection of Saccharomyces cerevisiae, also known as “baker’s yeast.”
Naturally found on ripe fruits, like grapes, as well as on and in the human body, S. cerevisiae is a facultative anaerobe, meaning it can survive and grow with or without oxygen. Whether or not bakers yeast uses oxygen is dictated by the carbon and energy sources available in its specific habitat. This demonstrates the incredible metabolic flexibility housed in these tiny eukaryotes, however, some substrates are more efficiently metabolized than others. When oxygen is absent, S. cerevisiae switches to fermentation to regenerate NAD+—a molecule essential for glycolysis and continued energy production. This shift maintains the cell’s redox balance, allowing it to keep generating ATP, and produces ethanol and carbon dioxide as byproducts.
To understand how different sugar substrates are utilized by S. Cerevisiae, we can measure the amount of CO2 produced. For every mole of glucose, yeast cells will produce two moles of CO2, which makes a quantification of sugar metabolism fairly straightforward. While scientists have invented a number of devices to measure the rate CO2 production resulting from fermentation in yeast, these devices can be expensive, or are impractical for classroom settings.
Here we will use a basic 15ml conical tube (such as Falcon or Corning brands) with gradation markings as a device to measure CO2 production in response to a variety of carbon sources. However, you can use other kinds of tubes that you have around.
Materials

Common Items
- Various sugars (try health food stores or online for the widest selection)
- Dextrose (glucose), Galactose, Lactose, Maltose, Sucrose (table sugar)
- Baker’s Yeast Packets
- Water
- Markers
- Balloons
- Tubes or Jars

Laboratory Equipment
- Water bath, hot plate, or pan & stove
- Beakers or flat-bottomed bowl/baking dish
- Timer
- Micropipettes & tips, transfer pipettes (or straws or medicine syringe)
- 15mL Conical Tubes and a needle OR test tubes and glass slides to cover
Preparation
- Prepare sugar stock solutions at 40% w/v (40g per 100ml of H2O)
- Prepare dilute sugar solutions for each sample tested
- For a recommended starting concentration of 0.5%, v/v, you’ll need 0.5 ml stock in 10 ml final volume
- Heat water baths and/or hot plates to 40 °C
- Warm all solutions to be used in the 40 °C bath
- Prepare a gas-collection setup (see below)
- Immediately before the experiment, prepare the 7% yeast solution in H2O
Setup
 Set up your tubes and water bath in such a way that the gas produced in each fermentation will rise to the tops of the tubes and volumes of gas can be marked with a permanent marker or waxed pencil.
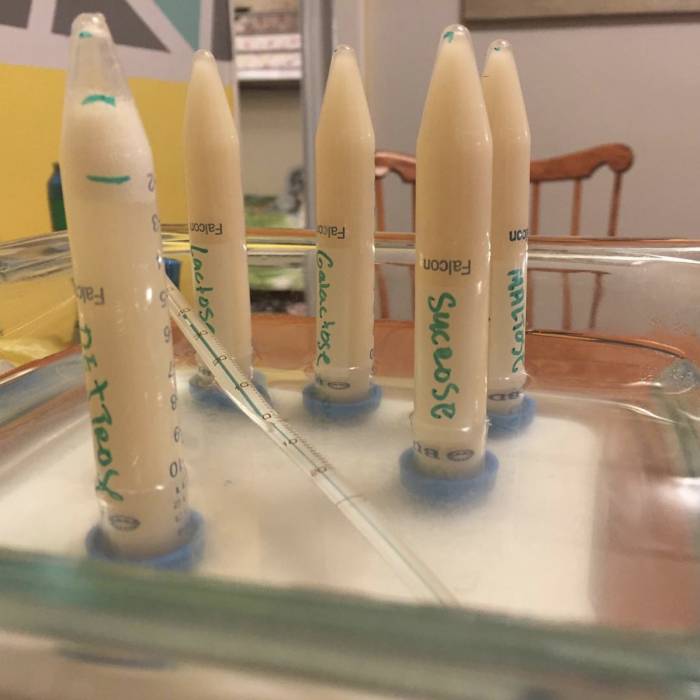
In the example at right, plastic tubes were used with a few holes poked into each plastic cap using a needle. The tubes were filled with yeast solution and food source (e.g. sucrose), covered, and inverted quickly into the water bath. The samples should be held inside the tubes and displaced into the water bath as gas is produced.
A similar setup can be used with test tubes and stoppers with holes (cover with your finger when inverting) or using a glass slide to invert each tube into the bath before sliding off the slide and allowing the fermentation gas produced to displace the yeast solution. You may also be able to use a typical gas collection apparatus from a chemistry laboratory at your school.
Finally, volumes of gas can be determined by emptying a marked tube and filling it with water exactly to the mark. Then that water can be poured into a graduated cylinder of appropriate size to determine the volume of gas produced.
Protocol
- Fill 15ml conical tube with 8ml of a sugar solution
- Mix the 7% yeast solution to be a uniform suspension. Fill the remainder of the tube (~7ml) with yeast solution such that the meniscus rises above the lip of the tube.
- Replace cap onto tube — because of holes, there will be a small squirt of solution to come out.
- NOTE: make sure that there are no sizeable air bubbles in the tube
- Invert the tube, and place in a large beaker filled with water (preheated to 40 °C). Place this beaker into a water bath or onto a hot plate to maintain temperature
- NOTE: you can also test the effect of temperature on fermentation by adjusting temperature of water bath or hot plate
- Immediately mark the bottom of the CO2 bubble (if there is one). Mark this point at 5 minute intervals for 30 minutes.
- At the end of the experiment, record the level of CO2 produced at each time interval by emptying the tube, filling with water to the mark, and pouring the water into a graduated cylinder or onto a balance for accurate measurement
What conclusions can you draw about the metabolism efficiency of different substrates by S. cerevisiae?