Demonstrating Live Organisms In Fermented Foods
Background
Fermented foods receive their tangy flavors, shelf stability, and possibly even health benefits from the active presence of “good” bacteria and/or yeast. Use this assay to demonstrate how fermented foods are teaming with bustling communities of microbes.
Materials

Corner Store: Grocery Items
- Purchase (and/or make) various fermented foods, e.g.
- fermented pickles (NOT vinegar pickles, those are different)
- kombucha
- yogurt
- kimchi

Laboratory Items
- Pre-poured agar plates (can be ordered online)
OR make your own using
- Petri dishes
- Agar powder
- Nutrient media (e.g. tryptic soy, LB, or bacto)
- OPTIONAL some of the fermentation medium (e.g. sweet tea for kombucha cultures)

More Laboratory Items (Household substitutes in parentheses)
- Sterile pipette (straw, turkey baster, or medicine syringe)
- Sterile swabs or spreaders (cotton swabs from an unopened package)
- Test tubes or plastic tubes (skip if not available)
- Flame or bunsen burner (candle)
- Hot water bath or heat block (pan of boiling water)
- Sharpie marker
- Gloves (optional)
Safety
CAUTION: once growing bacterial cultures out of their original, controlled host environments, do not open the plates as there is always a risk of culturing a more harmful organism in the process.
Procedure
Be sure to use aseptic technique, described in more detail below, while conducting all aspects of this preparation. Pre-made agar plates can be purchased from a variety of vendors, or made on your own (see recipe below).
- Collect the number of agar plates you will need, and label each with a sharpie marker to include your initials, date, ferment being plated, and the phrase “DO NOT OPEN”.
- Set up 2 tubes per ferment you plan on testing, and label each tube accordingly.
- Tube A will be prepared at room temperature.
- Tube B will be boiled before plating.
- For each ferment being tested, transfer approximately 1ml of fermentation liquid to Tube A, and 1ml of ferment liquid to Tube B.
- Each time you go to transfer materials from the source to a tube, or from tube to tube, be sure that the transferring instrument is sanitized each time, or use a new sterile transfer pipette.
- Keep set A tubes on the countertop. Boil sample set B for 10 minutes by placing the tubes in boiling water or a heat block set to 100 °C.
- by boiling the ferment, you are presumably killing all of the microbes present.
- Pour the liquid in each tube onto the correspondingly labeled agar plate.
- Spread the liquid culture evenly around the agar plate using a sterile swab or cotton swab.
- Return the lid to the agar plate, and allow the liquid to dry.
- Turn the plate upside down (so that the agar side is up) and leave on the countertop to grow for 1-4 days.
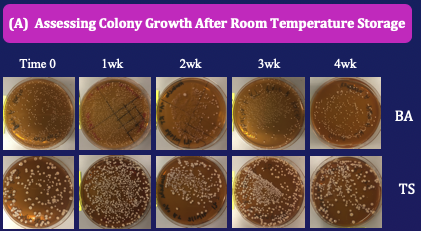
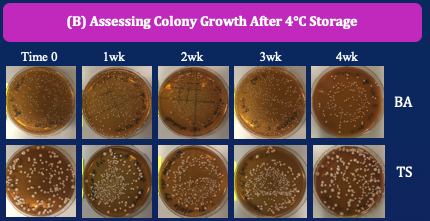
- Record observations, room temperature, and other factors that may be relevant.
- At the end of the growth period, compare the difference between Tube Set A (unboiled) and Tube Set B (boiled).
Do you notice a difference between the unboiled and boiled ferments after plating?
Make your own nutrient-agar plates
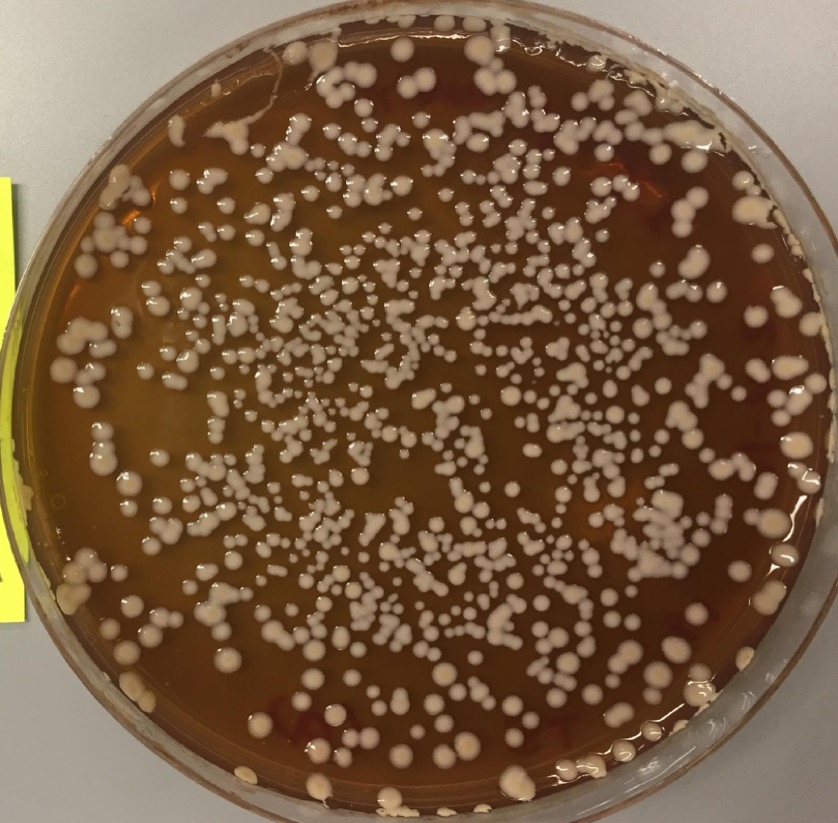
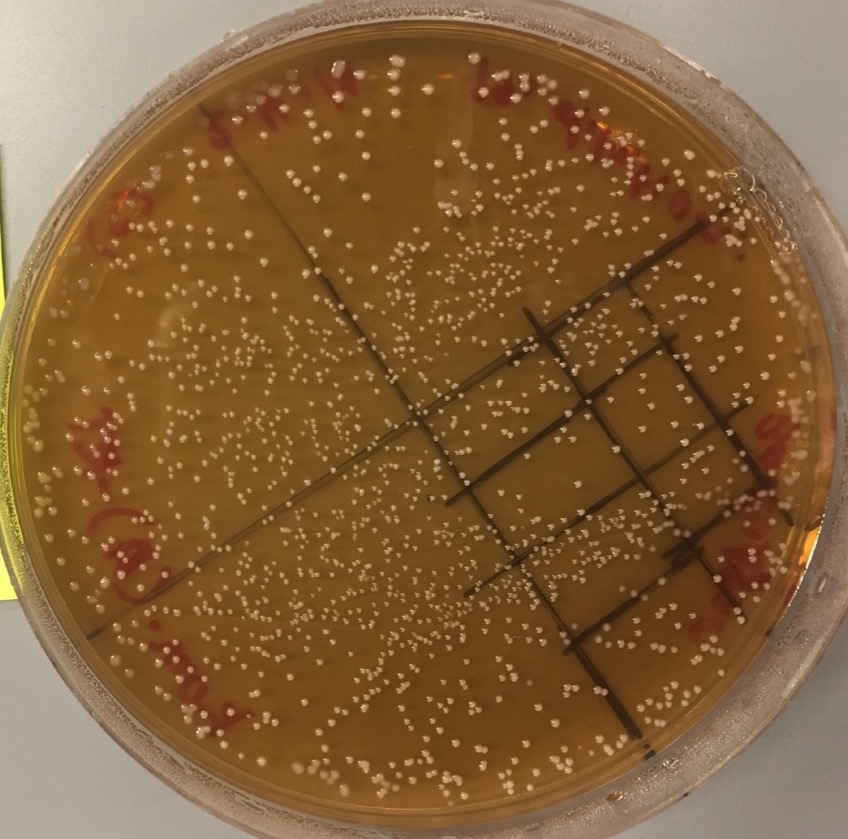
Agar plates provide the necessary nutrients and living environment for some microbes to grow and divide. Unlike microbes grown in liquid culture, the semi-solid nature of agar plates allows us to easily see discrete groups of microbes — commonly referred to as colonies — grow. Assessing the number of colonies can be a great way to quantify and compare microbial growth in an experiment.
While it seems like there may be a lot of steps when making your own agar plates, this process can be significantly streamlined to become an easy and cheap alternative to buying pre-made versions from scientific supply companies.
Aseptic Technique Considerations
“Aseptic technique” represents a set of steps to help ensure that you do not accidentally introduce microbes from the environment when making your own agar plates. Plate contamination will make it difficult to meaningfully interpret any experimental results, so it is important to prepare your plates on a clean workstation. However, even the best scientists will have accidental contamination some of the time. Microbes are resourceful little things 😈.
- Identify a flat surface that is free from clutter. Initially clean the surface so it is free from visible dirt and dust, and finish by cleaning the surface with a disinfectant.
- We use 70% ethanol, but rubbing alcohol from the drugstore is a great substitute. A 5% bleach solution is also effective, but be careful because it can stain your 👕👖👗.
- Once the surface is clean and dry, set up a flame source — this can be an alcohol burner or even a dinner candle.
- The flame source sends an updraft that helps to create a sterile field around the flame, which is where you should conduct your work.
- Wash your hands, and tie back your hair if it is long.
- Working next to the flame, set up all of the supplies that you will need to make agar plates. Using a sharpie or equivalent marker, label your empty petri dishes to match what you plan on growing in them, as well as other important information.
- You should label the “bottom” of the petri dish (where you pour the agar). It is not necessary to label the lid.
- Labels should succinctly identify what it is you are growing, the date you set it up, your initials, and any other identifying information.
Agar Plate Recipe
- Determine the number and size of petri/culture dishes you would like to use, as this will determine how much agar media you will need to make.
- Microbiologists commonly use 100mm x 15mm or smaller polystyrene dishes.
- As a note, each 100mm x 15mm plate will require approximately 20ml of media.
- Weigh out your agar powder such that the final concentration of agar will be 1% weight/volume, add agar to a flask, beaker, or jar.
- For every 100ml of media you wish to make, you will be using 1g of agar powder.
- Add your desired amount of water to the flask or equivalent container.
- Instead of water, you can also use the same liquid medium used to set up the ferment.
- If you have an autoclave, set it to the “liquid” setting, and autoclave for 10-25 minutes. If you do not have an autoclave, microwave the water-agar concoction for 3-5 minutes.
- Remove from autoclave or microwave being sure to use heat-resistant gloves or an oven mitt.
- Allow the mixture to cool so that it is warm to the touch.
- If the liquid is too hot, it will melt the plates (and burn your hands!) as you try to pour.
- Pour enough liquid into each plastic petri dish so that it just covers the bottom of the plate.
- Return the lid to the plate, and allow to cool.
- Your plates are ready when the agar solidifies.
Some Sample Experiments
This protocol can be used to simply demonstrate growth, or can be expanded as a platform for various experiments including some of the following


")


